Toilet tank sweating often occurs during the summer time, when cold water in the tank cools the porcelain, and warm, moist air condenses on the outside tank. Tank sweating must be repaired because it contributes to mildew, subfloor rotting, and the loosening of floor tiles.
Toilet tank sweating is repaired by insulating the inside of the tank. First drain the tank, then glue a liner made of foam rubber or polystyrene pads to the inside walls.
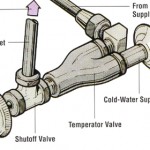
 If your incoming water supply is colder than 50 degrees, one unfailing way to eliminate condensation is to raise the temperature of the tank water. Raising the water temperature is accomplished by installing a temperature valve, which mixes hot water with the cold water supplying the tank. A hot water line is most often located at a near by sink or tub.
For pad insulation, first drain the tank and dry it thoroughly. Measure the inside depth and width of the inside of the tank. Measure the height from the bottom of the tank to a point 1 inch above the overflow pipe. Cut four pieces of 1/2 inch thick polystyrene pad or foam rubber to fit the front and back and each side.
Trim one 1 inch from the width of the front and back pieces so they’ll but up against the side pieces. Cutout a flush-handle shape in the front piece for the flush-handle bracket, and make sure the inserts do not interfere with any moving parts. Apply a generous coating of rubber cement or silicone glue to the tank surfaces and press the pads in place firmly. Let the glue dry 24 hours, and then before refill the tank.
